12.23.2012

CAD Tip Of The Day: Create a Block in AutoCAD

Create a Block in AutoCAD


block definition

Creating a block is a basic task that every AutoCAD user should know. But even if you've been using blocks for years, I think that you’ll find the links at the end to more advanced tips helpful. Put together, these tips make up an advanced tutorial on blocks.

What is an AutoCAD block? A block is simply a collection of objects (it could be one object) that has a name. Blocks have several advantages:


  •  You can insert them again and again, saving time. In fact, you can insert them into other drawings as well.
  •  A block uses less electronic space than individual objects, so your drawing file is smaller.
  •  By updating a block’s definition, you can update all the blocks in the drawing.

Note: Dynamic blocks are blocks that have added parameters that function in certain defined ways. Look at the end of this post for links to some posts on dynamic blocks.

How do you create a block?To create a block, follow these steps:


1. Draw the objects that you want in the block.


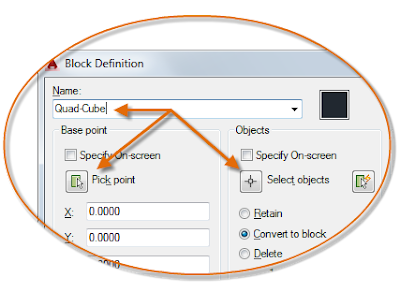
2. Choose Home tab,  Block panel, Create to start the BLOCK command. The Block Definition dialog box opens.


3. Type a name in the Name text box. The name can have spaces.


4. You need to specify a base point. That’s the point at which you’ll insert the block. In the Base Point section, click Pick Point. Be sure to use an object snap for accuracy! You’ll immediately be returned to the dialog box.


5. In the Objects section, click the Select Objects button. Select the objects and press Enter to return to the dialog box. Tip: You can select the objects before using the command and they’ll show up in the dialog box.


6. Just below, choose Retain, Convert to Block, or Delete. These options control what happens after you create the block.


7. In the Behavior section, you can make a block Annotative (more info here), force it to scale uniformly and choose whether to allow exploding.


8. In the Settings area, choose the block unit. You can choose Unitless but if you choose a unit, AutoCAD will try to scale the block appropriately when you insert it into another drawing. You can also add a hyperlink if you want.


9. Finally, you can add a description in the Description box. A description is helpful in the Design Center, when you want to insert the block from another drawing.


10. Click OK to complete the box. If you chose Delete, the objects disappear. You can use the OOPS command to bring them back.
Revit Tip: Text Aligning Problem

We recently were having problems with AutoCAD Mtext not importing correctly. In the AutoCAD file the Mtext was set to wrap, but when linked into Revit it wasn’t wrapped.

The solution:
In the AutoCAD drawing by putting a space (space bar) at the very end of the text, when linked into Revit the text will wrap. I would suggest linking the AutoCAD file into Revit to see which Text have issues and then only adding spaces to the problem text. Save the AutoCAD drawing and Reload this into the Revit Model.

1. The AutoCAD Drawing

autocad-mtext


2. The Linked AutoCAD drawing in the Revit File looks like this

linked-auotcad-mtext


3. Add a Space after the last letter of each line and all should be good. This should be done in AutoCAD.

add-space-after the last-letter

Another way is to explode the mtext to become text. Save the AutoCAD file and reload it to Revit via Manage links.

12.15.2012

Be Automated with AutoLISP

AutoCAD-AutoLISP

AutoLISP is a programming language designed specifically for use with the full version of AutoCAD (i.e. it does not work with AutoCAD LT). AutoLISP is one of a number of Application Programming Interfaces (APIs) built into AutoCAD but it is probably the easiest to use and therefore the most productive for the beginner. If you'd like to learn how to use AutoLISP to improve productivity, you're in the right place.


AutoLISP is a dialect of the LISP programming language (LISt Processing). LISP is the oldest high-level programming language, second only to FORTRAN. LISP has been the language of choice for the artificial intelligence in robotics. It is built into AutoCAD.

Free Ebook on AutoLISP Download Now
Free Autolisp Download Here

LISP and AutoLISP Books

Understanding AutoLISP: Programming for Productivity, William Kramer, Autodesk Press, ISBN 0-8273-5832-6.

AutoLISP in Plain English: A Practical Guide for Non-Programmers, George O. Head, Ventana Press, ISBN: 1566041406.

LISP, 3rd Edition, Patrick Henry Winston and Berthold Klaus Paul Horn, Addison-Wesley Publishing Company, ISBN 0-201-08319-1.

ANSI Common Lisp, Paul Graham, Prentice Hall, ISBN 0-13-370875-6.
Common LISP, The Language, Second Edition, Guy L. Steele, Jr., Digital Press, ISBN 1-55558-041-6.

12.02.2012

Cad Tip Of The Day

publish-etransmit

Share Files With ETransmit

"In many cases, people from outside the office will attach AutoCAD files to an e-mail message. Unlike other file formats, much of the data within a DWG can be lost during this kind of transmission. This is such a common occurrence, in fact, that I have a document at the ready to reply to these e-mails asking for a file transmittal created with the eTransmit tool. Using eTransmit properly makes the procedure easy and straightforward, but while creating Transmittal setups, one must pay attention to the following settings

"In order (from the top down and reading left to right), these settings are as follows:
* Transmittal package type: ZIP Compressed or Files.
* File format: It's important to understand that this is the right place for 'downgrading' to older versions, while still keeping your files up-to-date and free of data loss.
* Annotative features appeared in 2008; older versions won't support it. Let the software take care of that keep 'Maintain visual fidelity for annotative objects' checked.
* Transmittal file folder: Browse for a preselected location.
* Transmittal file name: Simple — check it out.
* Path options: I'll always prefer the 'Place all files in one folder' radio button (as shown in the screenshot above) so if the main file is opened from within the folder created by extracting the ZIP file, AutoCAD will easily find the attached files, font files as defined within styles, plot styles, etc., making it easier for your interactor to deal with the stuff you sent.
* In the upper-right corner, checking the 'Set default plotter to none' box will cause the files sent to forget their configurations for plotters that most likely won't be found in your interactor's office.
* I won't consider the 'Bind external references' option unless somebody convinces me otherwise, but it's always possible to do it at the location where the transmittal is received.
* Purge drawings: This is nice to have, but I prefer to have my files clean before being transmitted.
* Include options: This is simple; fonts is a must-have, and the others depend mostly on their existence. After you save your eTransmittal setup, you might consider the creation of several setups that meet different needs."

Revit Dynamo vs. Python Scripting: Choosing Your Automation Tool

Both Revit Dynamo and Python scripting are incredibly powerful tools for extending Revit's capabilities, automating repetitive tasks, an...